Ukrainian Christmas Dishes
Ukraine is a country that is rich in culture and traditions. One of the most important traditions is the celebration of Christmas. Ukrainian Christmas is celebrated on December 25th, and it is a time when families come together to enjoy a feast of traditional dishes.
Ukrainian Christmas dishes can vary greatly depending on the region and family traditions. The most important requirement is that the dishes should be lean, as the Holy Evening falls on the last day of the Philip’s Lent.
There is a certain sequence of eating Ukrainian Christmas Dishes on Christmas Eve. First, they eat kutia, then stuffed cabbage, Varenyky, fried fish or, cabbage, etc., and wash it down with a uzvar.
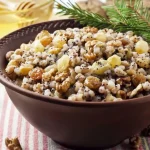
Traditional Kutia
Kutia is the most important of the Ukrainian Christmas Dishes that is served on Christmas Eve. It is made of wheat and honey and symbolizes prosperity and the connection between the living and the dead. The dish has evolved, and now it is common to add prunes, raisins, and other dried fruits and nuts to the recipe. By tradition, kutia is the first dish to start Christmas Eve dinner, and the head of the household should consume the first spoon.
Servings: 8
Calories: 323kcal
Ingredients
- 1 cup wheat berries
- 1 cup poppy seeds
- 1 cup honey
- 1 cup chopped walnuts
- ½ cup raisins
- ¼ cup slivered almonds optional
- ½ tsp salt
- 1 cup water
- 2 tbsp tablespoons sugar
- 1 tsp vanilla extract
- 1 cup boiling water
Instructions
- Rinse the wheat berries thoroughly and soak them overnight in water.
- Drain the soaked wheat berries and place them in a large pot.
- Add 1 cup of water and bring to a boil.
- Reduce heat, cover, and simmer for about 1 hour or until the wheat berries are tender but still chewy.
- Drain any excess water.
- Grind the poppy seeds in a food processor or coffee grinder until they are coarsely ground.
- In a large mixing bowl, combine the cooked wheat berries and ground poppy seeds.
- In a saucepan, combine honey, sugar, and 1cup of boiling water.
- Stir over medium heat until the sugar is dissolved.
- Add the vanilla extract and salt, and mix well.
- Pour the honey syrup over the wheat berries and poppy seeds mixture.
- Stir in chopped walnuts, raisins, and slivered almonds (if using).
- Allow the Traditional Kutia to cool to room temperature before serving.
Notes
- To ensure the wheat berries are tender and cook evenly, soak them overnight. This helps reduce the cooking time and results in a better texture.
- For the best flavor, grind the poppy seeds just before adding them to the recipe. This ensures a vibrant taste and aroma in your Kutia.
- The sweetness of Kutia can be adjusted to personal preference. Taste the honey syrup before adding it to the wheat and poppy seed mixture, and adjust the sweetness accordingly.
- Feel free to experiment with the types of nuts used. While walnuts are traditional, you can also try pecans, hazelnuts, or a mix for a unique flavor profile.
- If you enjoy a bit of crunch, add slivered almonds to the traditional Kutia. They complement the texture of the dish and add an extra layer of flavor.
- The honey is a key component of traditional Kutia, so opt for a high-quality, flavorful honey. It will enhance the overall taste of the dish.
- When serving, consider garnishing with additional nuts, raisins, or a sprinkle of cinnamon for a visually appealing presentation.
- Traditional Kutia can be enjoyed warm or at room temperature. Allowing it to cool after preparation lets the flavors meld together for a more delightful eating experience.
- Kutia can be made a day in advance. It often tastes even better the next day as the flavors continue to develop.
- Kutia is a dish meant to be shared with family and friends. Embrace the festive spirit and share this traditional Ukrainian delight with your loved ones.

Varenyky with Plums
On Christmas Eve, it is quite popular to play the varenyky game: a housewife puts a pinch of pepper in the first varenyk, a lump of sugar in the second one, and a coin in the third one. Whoever gets the peppered piece will have a surprise in the coming year; whoever eats the sugared one will enjoy a sweet life, and whoever finds a coin inside will be rich.
Servings: 6
Calories: 246kcal
Ingredients
- 2 lbs. Plums
- 4 ½ cups wheat flour
- 1 tsp salt
- 2 eggs
- 2 oz butter
- ½ cup milk
- ½ cup sugar
- 1 ½ tbsp sugar
- 1 pinch nutmeg
- 1 oz powdered sugar
- 2 oz walnuts
Instructions
- Beat the eggs with room temperature butter until fully mixed.
- Add milk, salt, and flour, and knead until the dough is fairly stiff.
- Knead the dough until smooth and elastic for about 10 minutes.
- Roll the dough into a ball and rest for about 30 minutes.
- Cut the plums on one side and remove the pit.
- In a separate bowl, mix cinnamon, nutmeg, and sugar.
- Fill a plum with at least ½ tsp of the cinnamon-sugar mixture.
- Close the plum tightly and place it on a dough circle.
- Cover with another dough circle, firmly pinch the edges in a wave, or clamp them with a fork.
- Boil the varenyky in batches of 8-10 for 10-15 minutes in salted water.
Notes
- Opt for ripe but firm plums. Overripe plums can become mushy during cooking and may not hold their shape well.
- The dough should be firm yet elastic. If it’s too soft, it might not hold the filling well. If it’s too hard, the vareniki might turn out tough.
- Make sure to seal the edges of the vareniki properly to prevent the filling from leaking out during cooking.
- When boiling the vareniki, don’t overcrowd the pot. They should have enough space to move freely. This prevents them from sticking together.
- For the best flavor, use fresh ingredients. Fresh plums, in particular, will give your vareniki a vibrant, fruity flavor.
- Feel free to adjust the amount of sugar and spices according to your taste. Some prefer their vareniki sweeter, while others like a more subtle sweetness.
- Vareniki is traditionally served with sour cream or melted
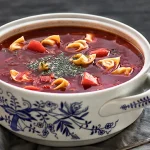
Lenten Borscht with Vushki
Borshch is the most popular Ukrainian soup and is routinely consumed in every household. It is a must-have on Christmas Eve as well. The only difference is that Borshcht should be lean on this occasion. This red beet soup contains shredded cabbage, beans, tomatoes, and some vinegar for acidity. Interestingly, there is no only recipe for borshch as each cook is said to have her secret ingredients she’s not supposed to unveil.
Servings: 4
Calories: 178kcal
Ingredients
For Borscht:
- 8 ½ cups mushroom stok
- 2 tbsp tomato paste
- 3 beets
- 1 onion
- 1 small carrot
- vegetable oil
- 1 bay leaf
- salt and pepper to taste
For Vushki
- 7 oz ounces of dried white mushroom or any dried mushrooms
- 1 onion
- flour
- water
- vegetable oil for fryin
- salt, and pepper to taste
Instructions
For Borscht:
- Boil the beets in advance. When it cools down, grate it.
- Soak dry mushrooms (white mushrooms are best, of course, because they are fragrant and tasty) overnight. Cook until tender. Strain the broth. We will use the mushroom broth for borscht.
- Finely chop the mushrooms. If you want, you can add a little bit of uncut mushrooms to the borscht.
- Put the strained mushroom broth on the fire. Dice the onion, grate the carrots, and fry them in vegetable oil until golden brown. Add the tomato paste and simmer for 3-5 minutes.
- Pour everything into the mushroom stock, add bay leaf, salt, and pepper, boil, and cook for a few more minutes.
For Vushki
- We recommend not grinding the mushrooms in a meat grinder, but chopping them finely.
- Put them in a hot frying pan with oil, add onions, salt, and pepper, and fry for a few minutes.
- Prepare the dough like for dumplings. Add hot water to the flour, a little oil, salt, and pepper.
- Roll out the dough thinly, and cut it into squares. Put a little filling on the square, fold the dough into a triangle, pinch the edges, and join the dumpling edges together.
- Boil the ears in salted water and brush with vegetable oil. Serve with borsch.
Notes
- It is unlikely that you will grind the mushrooms in a meat grinder.
- Some people also add potato cubes. But it’s up to you. The traditional recipe is without potatoes.

Lenten Cabbage Pie
It is more than just a pie, it is a culinary journey that invites you to take your time, enjoy, and appreciate the simplicity and elegance of Ukrainian Christmas traditions. Join us to taste our cabbage pie, where every bite is a movement in a culinary concert that invites you to enjoy the harmonious interaction of ingredients and the joy of sharing a meal.
Servings: 6
Calories: 315kcal
Ingredients
Instructions
- Pour into a deep container, of slightly heated water, and dissolve salt, yeast, and sugar in it. Cover with food film and leave it warm for a quarter of an hour for the yeast to start working.
- Mix the yeast with flour, add a tablespoon of butter, and knead the dough for ten minutes so that it stops sticking to your palms.
- Cover the dough again and leave for an hour and a half. It should double.
- Cut cabbage into squares. Heat the pan, pour in the oil, and spread the cabbage into it, season with salt and pepper, and fry for about 20 minutes, stirring constantly.
- Divide the dough in half. In this case, one part should be slightly less than the second. Roll a larger piece of dough into a layer, a bit larger form, in which you will bake a cake.
- Grease the form with butter and gently cover it with rolled dough. Spread roasted cabbage and cover with a second, previously rolled-out layer of dough. Edges we pinch, forming a beautiful piping. We pierce in several places with a fork.
- Coat the surface of the cake with olive oil and bake for 20 minutes at 392 °F (200°C) until a delicious crust appears on top.
- Enjoy your meal! 😊
Notes
Sift flour several times to saturate it with oxygen.
Sauerkraut and Mushroom Salad
Made with simplicity, this salad is brimming with flavor and essential nutrients. The combination of tangy sauerkraut and earthy mushrooms creates a harmonious taste sensation that is sure to please even the most discerning palate. It will be a good accompaniment for another's Ukrainian Christmas Dishes
Servings: 1
Calories: 70kcal
Ingredients
- 3 oz sauerkraut
- 2 oz salted or picled musrooms
- 1 tbsp onion diced
- 2 tsp olive oil
- ½ tsp parsley finely chopped
- sugar to taste
Instructions
- Begin by draining some of the juice from the sauerkraut.
- Next, add diced onions and salted or pickled mushrooms to the sauerkraut.
- Dress the mixture with fresh sunflower oil and sugar to taste.
- Mix everything until well combined.
- Transfer the salad to a serving bowl and garnish with finely chopped parsley.
Notes
- Can be stored in an airtight container in the refrigerator for up to 3 days.
- It’s best to consume the salad within this time frame to ensure that it remains fresh and flavorful.

Shulyky with Honey and Poppy Seeds
This sweet and nutty dessert is made with wheat dough, honey, and poppy seeds, and is typically served during the Makoviy holiday. The dessert is made by baking a large cake, which is then broken into pieces and served with a sweet sauce made from poppy seeds and honey.
Servings: 6
Calories: 246kcal
Ingredients
For the water-based crust:
- 2 cups flour
- 1 egg
- 1 tbsp honey
- ½ tsp baking powder
- ¾ cup water
- pinch salt
For Poppy seed and Honey filling:
- 1 cup poppy seed
- 1 cup boiling water
- 2 tbsp honey
Instructions
- Pour flour into a bowl, add baking powder and a pinch of salt, and mix.
- In a separate container, mix water and honey, pour it into the dough, start mixing with a spoon, then knead with your hands to make a stiff dough that does not stick to your hands.
- Leave the finished dough in a bowl, covered with foil or a towel, and let it stand for 20-30 minutes
- Preheat the oven to 338℉ (170℃) degrees.
- Roll out the dough into a layer about 1/4 Inch. It is better to roll it out directly on baking paper.
- Put the paper with a layer of dough on a baking sheet, put the baking sheet in the oven, and bake for about 15-20 minutes to dry and lightly brown the cake.
- Remove from the oven and let it cool completely.
- Meanwhile, let's move on to the poppy seeds. Pour it into a deep bowl, pour boiling water over it, and cover. Leave it for 30 minutes.
- Then drain the water and transfer the poppy seeds to a blender. Start grinding until the mass begins to turn white.
- Gradually add water and continue to grind, bringing the mass to a consistency resembling liquid porridge.
- Add honey, stir, and bring to taste.
- Break the cooled cake into small pieces. Put the pieces into a deep plate or a pot. Pour over the poppy seed and honey mixture.
Notes
- You can use a sharp knife to make a grid on the surface of the rolled-out dough – this is a marking to make it easier to break the cakes into equal pieces (squares or rhombuses). But this is unnecessary because you can break it as you like.
- liquid honey you can take more to pour over the dish
- The hardest part is waiting for the cakes to set and get wet.

Homemade Lightly Salted Herring
Homemade lightly salted herring is a dish that’s revered for its simplicity and depth of flavor.
Servings: 1
Calories: 125kcal
Ingredients
- 1 large herring
- 1 ½ cups water
- 1 ½ tbsp salt to taste
- 3 pcs oregano pepper
- 5 pcs black peppercoms
- 2 pcs Cloves
- 1 bay leaf
- nutmeg, cardamom, cumin, or mustard seeds optional
Instructions
- Gather all the required ingredients. If your herring is frozen, make sure to defrost it in advance. Leave the herring whole, with the head and tail intact. Use filtered or bottled water for this recipe.
- In a saucepan, combine the salt, sugar, oregano pepper, black peppercorns, cloves, and bay leaf. You can adjust the amount of salt to your taste if you prefer a saltier herring. Feel free to experiment with other spices like nutmeg, cardamom, cumin, or mustard seeds
- Pour the clean cold water into the saucepan with the spices. Place the saucepan over medium heat and bring the water to a boil. Allow the brine to simmer for about 5 minutes, ensuring that the salt and sugar completely dissolve. Then, let the brine cool.
- Rinse and dry the defrosted herring thoroughly. Select a suitable container made of glass or food-safe plastic to marinate the fish.
- Place the whole herring in the chosen container. Pour the cooled brine over the herring, ensuring that it is fully submerged. Seal the container with a lid and place it in the refrigerator for 2 days. During this time, remember to take the container out of the refrigerator and flip the herring over in the brine both in the morning and evening to ensure even salting.
- After the two-day marinating period, remove the herring from the brine. Pat it dry and then cut off the head and tail. Open the belly and remove the insides. Finally, cut the herring into serving-sized pieces.
- Serve the lightly salted herring with onions, herbs, and fragrant olive oil.
Notes
- Lightly salted herring should be stored in a refrigerator at temperatures between 32°F (0°C) and 40°F (4°C).
- Store the herring in an airtight container or resealable plastic bag to prevent moisture loss and to contain the fishy odor.
- If your herring is not already stored in a brine solution, you can prepare a simple brine by dissolving salt in water. Submerge the herring in this brine solution before placing it in the refrigerator.
- The brine helps maintain the fish’s texture and flavor, as well as keeps it moist.
- Lightly salted herring has a limited shelf life, even when refrigerated. It’s best to consume it within a few days to a week for the best flavor and quality.
- If you have a larger quantity than you can consume in a short time, consider freezing it (see below).
- If you want to store lightly salted herring for an extended period, consider freezing it.
- Wrap individual portions or fillets tightly in plastic wrap or aluminum foil. Place them in an airtight container or freezer bag to prevent freezer burn.
- Label the container with the date to keep track of its freshness.
- Frozen herring can be stored for up to 3-4 months without a significant loss of quality
- Before consuming lightly salted herring, always check for signs of spoilage, such as off-putting odors, discolored flesh, or an unusual texture. If any of these are present, discard the herring to avoid foodborne illness

Braised Cabbage with Mushrooms
This recipe, steeped in tradition, brings together the earthy flavors of cabbage and mushrooms in a delightful dance of taste and texture. The cabbage, braised to perfection, absorbs the rich flavors of the mushrooms, creating a dish that is both comforting and satisfying.
Servings: 6
Calories: 148kcal
Ingredients
- 1 medium cabbage cut into 8 wedges with core intact
- 8 oz mushrooms sliced
- 1 ½ cup vegetable stock
- 1 ¼ cup beer such as a pilsner or lager
- 3 cloves garlic minced
- 3 shallots thinly sliced
- 2 sprigs thyme stems removed
- 2 tbsp butter
- 1 tbsp Dijon mustard
- 1 tbsp all-purpose flour
- 1 tbsp apple cider vinegar
- 2 tbsp olive oil extra virgin
- 1 ½ tsp caraway seeds
- salt to taste
- fressly ground mlack pepper to taste
Instructions
- Heat 2 tablespoons of oil in a large Dutch oven or heavy-bottomed pot until it starts to shimmer.
- Add cabbage wedges in one even layer and cook, turning once, until
- Wipe out the pot, and melt butter over medium heat until foamy. Add mushrooms and cook until they begin to become golden brown, 6 to 7 minutes. Stir in shallots and carrots, and cook until softened, about 5 minutes more.
- Add garlic, caraway seeds, and thyme, and cook until just fragrant, about 1 minute.
- Add Dijon and cook for about 1 minute more. Sprinkle the flour over the mixture, mix thoroughly, and cook until the smell of raw flour dissipates about 1 to 2 minutes.
- Pour in the beer, vegetable stock, and apple cider vinegar, making sure to scrape any browned bits from the bottom of the pot.
- Bring to a boil, then reduce the heat to a simmer, allowing the liquid to cook down until reduced by about one-third, about 8 minutes.
- Season the braising liquid to taste with salt and pepper, then add the cabbage back to the pot
- Enjoy your meal! 😊
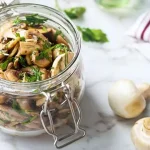
Marinated Mushrooms
The marinated mushrooms recipe is a symphony of flavors, marrying the earthiness of mushrooms with the tangy embrace of a delightful pickling blend.
Servings: 1
Calories: 157kcal
Ingredients
- 2 lbs. fresh mushrooms
- 2 cups water for marinade
- 1 tbsp sugar
- 1 tbsp salt
- 8 black peppercorns
- 6 tbsp apple vineagr
- 6 bay leaves
- 2 cloves flower buds
- 6 cloves garlic
Instructions
- Rinse the mushrooms thoroughly. If they are large, cut them into halves.
- Place the mushrooms in a pot and fill it with water. Wait until it boils and simmer for 5 minutes.
- Drain the water and let the mushrooms cool down.
- Prepare the marinade. In cold water, add all the ingredients listed. If desired, add other spices.
- Pour the mushrooms into the pot and put it on the stove. Boil for about 10 minutes from the moment of boiling.
- Put the mushrooms in jars and pour the prepared liquid. Roll up the lids, turn them over, and wait for them to cool.
Notes
- It is recommended to store it in a cool place.
- Feel free to adjust to your taste.
- Enjoy your Marinated Mushrooms!

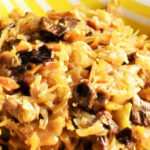
Lenten Stuffed Cabbage Rolls with Rice and Mushrooms
This is one of the Ukrainian Christmas Dishes that is often served during Lent, the period of fasting before Easter and Christmas Eve. Lenten Stuffed Cabbage Rolls with Rice and Mushrooms are made with tender cabbage leaves that are filled with a mixture of rice, mushrooms, onions, garlic, and herbs. They are then baked in a tomato sauce that adds a tangy and savory flavor.
Servings: 4
Calories: 257kcal
Ingredients
- 1 large head of cabbadge
- 1 cup white rice uncooked
- 2 cups mushrooms finely chopped
- 1 large oinion finely chopped
- 3 cloves garlic minced
- 1 can diced tomatoes 14 oz
- 1 can tomato sauce 8 oz
- ¼ cup tomato sauce
- ¼ cup vegetable oil
- ½ cup vegetable borth
- 1 tsp dried thyme
- 1 tsp dried oregano
- salt and pepper to taste
- fresh parsley for garnish
Instructions
- Core the cabbage and carefully place it in a pot of boiling water. Peel off the softened leaves one by one. Set aside.
- Cook the rice according to the package instructions. Set aside.
- In a large skillet, heat vegetable oil over medium heat. Add chopped onions and garlic, sauté until softened. Add chopped mushrooms and cook until they release their moisture.
- Season with salt, pepper, thyme, and oregano. Stir in cooked rice.
- Place a spoonful of the rice and mushroom mixture onto each cabbage leaf. Fold the sides of the cabbage leaf over the filling and roll it up.
- In a bowl, combine diced tomatoes, tomato sauce, tomato paste, and vegetable broth.
- Line the bottom of a large pot with spare cabbage leaves. Place the cabbage rolls in layers, seam side down.
- Pour the tomato sauce over the cabbage rolls. Simmer on low heat for 45-60 minutes, allowing the flavors to meld.
- Garnish with fresh parsley and serve the Lenten Stuffed Cabbage Rolls hot
Notes
- Choose a cabbage with large, flexible leaves. This makes it easier to roll and ensures the filling stays intact.
- Boil the whole cabbage briefly to soften the leaves, making them pliable for rolling. Be cautious not to overcook; you want them tender but still resilient.
- Sauté the mushrooms until they release their moisture and turn golden brown. This enhances their flavor and prevents excess liquid in the filling.
- Season the rice and mushroom mixture generously. Lenten dishes benefit from well-balanced seasoning, so taste and adjust as needed.
- Add dried thyme and oregano to the filling for an extra layer of aromatic flavor. Fresh herbs can also be used for a burst of freshness.
- Line the pot with cabbage leaves before placing the rolls. This prevents sticking to the bottom and adds an extra layer of flavor.
- Roll the cabbage leaves tightly around the filling to prevent them from unraveling during cooking. A snug roll ensures the flavors meld together.
- Adjust the thickness of the tomato sauce to your liking. If it’s too thick, add a bit more vegetable broth for a saucier result.
- Just before serving, sprinkle the Lenten Cabbage Rolls with fresh parsley. This adds a pop of color and a hint of freshness to the dish.
- These cabbage rolls taste even better the next day. Consider making them in advance and reheating them for a quick and flavorful Lenten meal.
- Accompany the cabbage rolls with a side of steamed vegetables or a light salad to create a balanced and satisfying Lenten feast.

Homemade Uzvar Recipe
One such delightful tradition that warms both the heart and the soul is the making of Uzvar—a timeless, fruity concoction that hails from Eastern Europe and beyond. In this
Servings: 6
Calories: 92kcal
Ingredients
- 2 qt water
- 8 oz mix of dried fruits and berries apples, pears, prunes, raisins, cherries, cranberries, etc
- ⅔ cup sugar
- cinnamon, cloves, or other spices for flavoring optional
Instructions
- Prepare a mixture of dried fruits and berries. You can use a single type of fruit or mix them to your preference. Remove any pits or seeds if necessary.
- Place the mixture of fruits and berries into a large pot
- Add water and place the pot over medium heat. Bring it to a boil, then reduce the heat and simmer the mixture covered for approximately 30-40 minutes until the fruits and berries become soft.
- Add sugar to taste and stir until it completely dissolves. If you want to add spices like cinnamon or cloves, do so at this point.
- Continue simmering the mixture for an additional 10-15 minutes.
- Remove the pot from the heat and let the uzvar cool to room temperature.
- Chill the uzvar in the refrigerator before serving. Uzvar can be served both hot and cold, with ice if desired.
- Serve the uzvar in glasses or cups, garnished with slices of fruits or berries.
Notes
- Choose a diverse mix of dried fruits and berries to add complexity to your uzvar. Apples, pears, prunes, raisins, cherries, and cranberries are excellent options. Feel free to experiment with different combinations.
- Before simmering, be sure to remove any seeds or pits from the dried fruits, especially if you’re using prunes or cherries. This prevents any unwanted bitterness.
- The amount of sugar you use can vary based on your preference and the sweetness of your dried fruits. Start with a smaller amount and add more if needed during the cooking process.
- Consider adding a cinnamon stick, cloves, or other spices to infuse your uzvar with extra warmth and aroma. Remember that spices can be quite potent, so a little goes a long way.
- When simmering your uzvar, use low to medium heat and keep it covered. This slow cooking process allows the flavors to meld and the dried fruits to become tender.
- After cooking, let your uzvar cool to room temperature before chilling it in the refrigerator. This gradual cooling process allows the flavors to further develop.
- When serving, garnish your uzvar with fresh slices of fruits or berries for an attractive presentation. You can also add ice if you prefer it cold.

Boiled Potatoes with Crushed Garlic
This dish marries the simplicity of boiled potatoes with the boldness of crushed garlic, resulting in a sensational side that will elevate any meal.
Servings: 4
Calories: 180kcal
Ingredients
- 2 lb. potatoes
- 4 tbsp olive oil
- 1 tsp salt
- 4 cloves salt and black pepper to taste
Instructions
- Wash and scrub the potatoes gently under running water to remove any surface debris.
- Transfer the potatoes to a large saucepan or large pot and cover with cold water by at least 2 inches. Add 1 teaspoon of salt to the water
- Set over high heat. Once the water reaches a boil, reduce heat to low heat, cover, and maintain a gentle simmer.
- Cook the potatoes until they are fork-tender and the skin just starts splitting from the potatoes
- Drain the potatoes into a large colander. Immediately return the pan to medium heat.
- In a saucepan add the olive oil, fresh garlic, and a generous pinch of salt and black pepper, and mix it
- Add the boiled potatoes to the pan and toss to coat in the garlic mixture.
- Serve and enjoy!